Deployment on Heroku


Screen Shot 2014-12-05 at 12.50.10 PM I recently pushed my AngularJS/Spring Boot/Rest application to Heroku.

buildscript {
    repositories {
        maven { url "http://repo.spring.io/libs-release" }
        mavenLocal()
        mavenCentral()
    }
    dependencies {
        classpath("org.springframework.boot:spring-boot-gradle-plugin:1.1.8.RELEASE")
    }
}

apply plugin: 'java'
apply plugin: 'eclipse'
apply plugin: 'idea'
apply plugin: 'spring-boot'
mainClassName = "rest.controller.Application"

jar {
    baseName = 'Angular-Boot-Rest'
    version =  '0.1.0'
}

repositories {
    mavenLocal()
    mavenCentral()
    maven { url "http://repo.spring.io/libs-release" }
}


tasks.withType(Copy) {
        eachFile { println it.file }
}

dependencies {
    compile("org.springframework.boot:spring-boot-starter-web")
    testCompile("junit:junit")
}

task wrapper(type: Wrapper) {
    gradleVersion = '1.11'
}
task stage(dependsOn: ["build"]){}

I added a new task stage and mainClassName.

It allots a free port on which Tomcat binds. If one specified one’s own port then the application does not bind to it within 60 seconds which is the time limit allowed.

Heroku needs this file too.

Procfile

web: java $JAVA_OPTS -jar target/Angular-Boot-Rest.jar

This is the screenshot. Note the URL which is allotted too.

Screen Shot 2014-12-05 at 1.02.05 PM

Processed 0.25 TB on Amazon EMR clusters

I did that by provisioning 1 m1.medium Master node and 15 m1.xlarge Core nodes. This is easy and relatively cheap.
Since I deal with Pig I don’t have to design my MapReduce Jobs. I have to learn how to code MR jobs in the future.

This command stores the result in a file. I used to count the records in the file but I realized I don’t have to because the command actually prints how many records it writes.

store variable INTO '/user/hadoop/file' USING PigStorage();

Pig JOIN

This execution cost me $1.76 for about 1 hour. The number of machines is the same(previous post).

X = FILTER ntriples BY (subject matches '.*business.*');
y = foreach X generate subject as subject2, predicate as predicate2, object as object2 PARALLEL 50;
j = JOIN X BY subject,y BY subject2 PARALLEL 50;
j = DISTINCT j PARALLEL 50;

Screen Shot 2014-08-26 at 8.06.23 PM

Counting the records in the file.

FILE = LOAD 'join-results';
FILE_C = GROUP FILE ALL;
FILE_COUNT = FOREACH FILE_C GENERATE COUNT(FILE);

Cluster configuration

Screen Shot 2014-08-22 at 11.40.38 AM

So this is the real deal. The Pig Job mentioned in the previous post failed when the actual file was processed on the EMR cluster. It succeeded only after I resized the cluster and added more heap space.

I used 1 m1.small master node, 10 m1.small code nodes and 5 m1.small task nodes. I think so many nodes are not needed to process this file and just the increased heap without the task nodes would have been sufficient.

Screen Shot 2014-08-22 at 11.47.09 AM
Screen Shot 2014-08-22 at 11.47.29 AM

Big Data analysis on the cloud

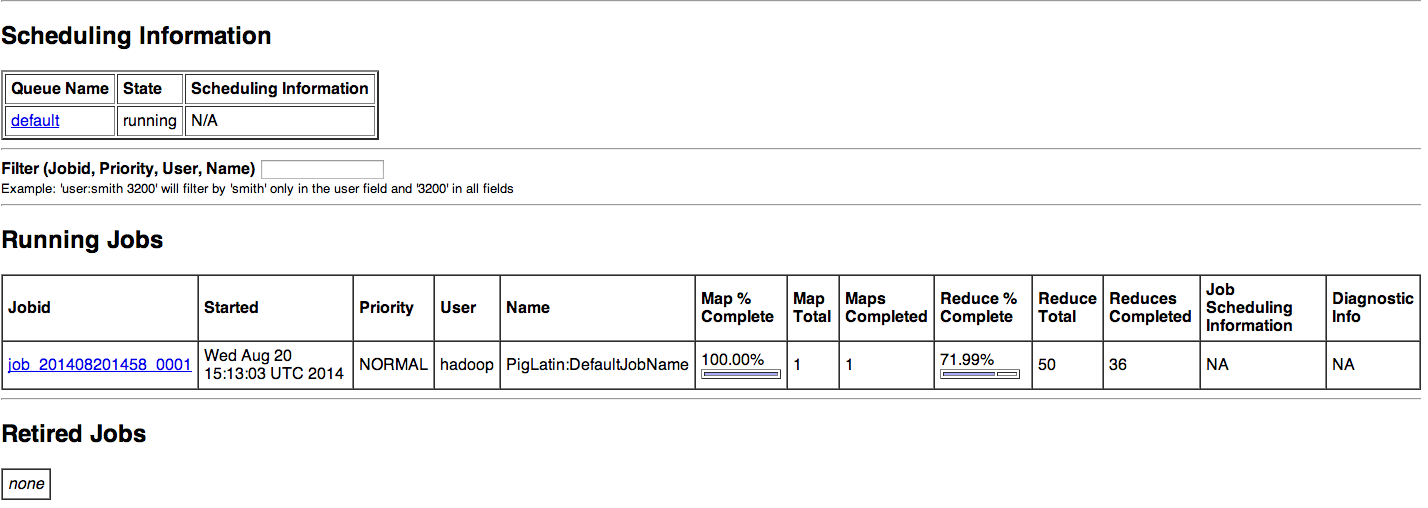
I was given this dataset( http://km.aifb.kit.edu/projects/btc-2010/). I believe it is RDF. But more importantly I executed some Pig Jobs locally and this is how it worked for me. The main idea here is how it helped me to learn about Pig MapReduce Jobs.

The data is in quads like this.

<http://openean.kaufkauf.net/id/businessentities/GLN_7654990000088> <http://www.w3.org/2000/01/rdf-schema#isDefinedBy> <http://openean.kaufkauf.net/id/businessentities/><http://openean.kaufkauf.net/id/businessentities/GLN_6406510000068> .
<http://openean.kaufkauf.net/id/businessentities/GLN_3521100000068> <http://www.w3.org/1999/02/22-rdf-syntax-ns#type> <http://purl.org/goodrelations/v1#BusinessEntity> <http://openean.kaufkauf.net/id/businessentities/GLN_6406510000068> .

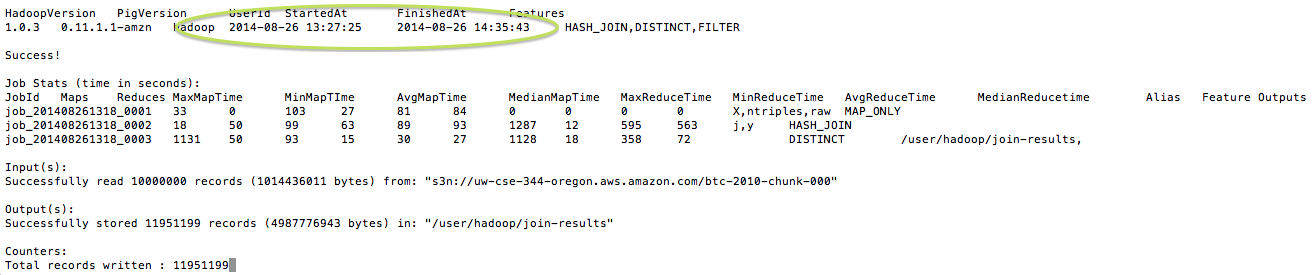
After processing by another Pig script I started working with this data.

(<http://openean.kaufkauf.net/id/businessentities/GLN_7612688000000>,3)
(<http://openean.kaufkauf.net/id/businessentities/GLN_7615990000096>,3)
(<http://openean.kaufkauf.net/id/businessentities/GLN_7634640000088>,3)
(<http://openean.kaufkauf.net/id/businessentities/GLN_7636150000008>,3)
(<http://openean.kaufkauf.net/id/businessentities/GLN_7636690000018>,3)
(<http://openean.kaufkauf.net/id/businessentities/GLN_7654990000088>,1)
(<http://openean.kaufkauf.net/id/businessentities/GLN_7657220000032>,3)
(<http://openean.kaufkauf.net/id/businessentities/GLN_7658940000098>,3)
(<http://openean.kaufkauf.net/id/businessentities/GLN_7659150000014>,3)
(<http://openean.kaufkauf.net/id/businessentities/GLN_7662880000018>,3)

The schema of the data is like this.


count_by_object: {group: chararray,count: long}

x = GROUP count_by_object BY count;
y = FOREACH x GENERATE group,COUNT(count_by_object);

Line 1 shown above groups the tuples by the count. This is what I get.

(1,{(<http://openean.kaufkauf.net/id/businessentities/GLN_7654990000088>,1)})
(3,{(<http://openean.kaufkauf.net/id/businessentities/GLN_0000049021028>,3),(<http://openean.kaufkauf.net/id/businessentities/GLN_0000054110120>,3),(<http://openean.kaufkauf.net/id/businessentities/GLN_0078477000014>,3),(<http://openean.kaufkauf.net/id/businessentities/GLN_0084610000032>,3),(<http://openean.kaufkauf.net/id/businessentities/GLN_0088720000050>,3),(<http://openean.kaufkauf.net/id/businessentities/GLN_0120490000028>,3),(<http://openean.kaufkauf.net/id/businessentities/GLN_0133770000090>,3),(<http://openean.kaufkauf.net/id/businessentities/GLN_0144360000086>,3),(<http://openean.kaufkauf.net/id/businessentities/GLN_0146140000040>,3),(<http://openean.kaufkauf.net/id/businessentities/GLN_0160080000038>,3),(<http://openean.kaufkauf.net/id/businessentities/GLN_0162990000030>,3),(<http://openean.kaufkauf.net/id/businessentities/GLN_0165590000028>,3),(<http://openean.kaufkauf.net/id/businessentities/GLN_0166620000056>,3),
.........

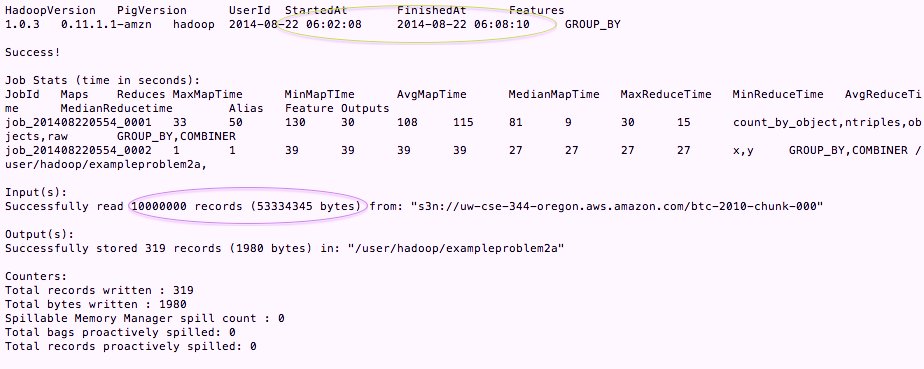
Line 2 of the Pig script give me this result.

(1,1)
(3,333)

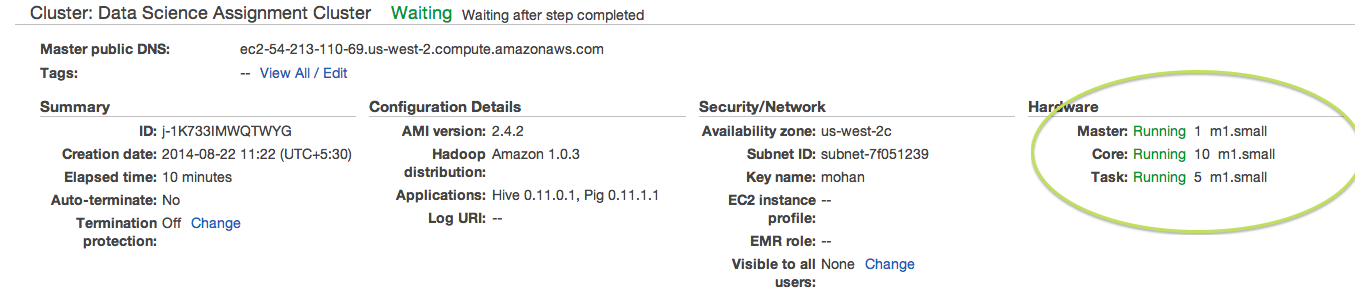
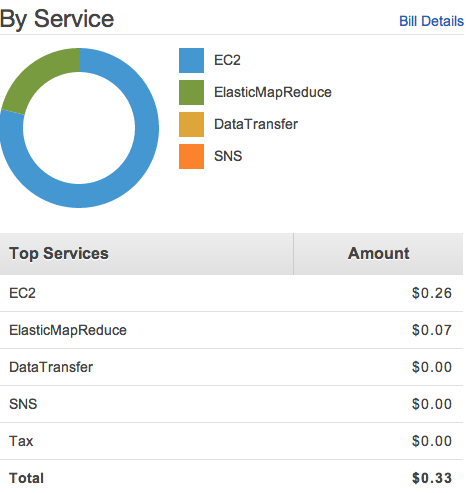
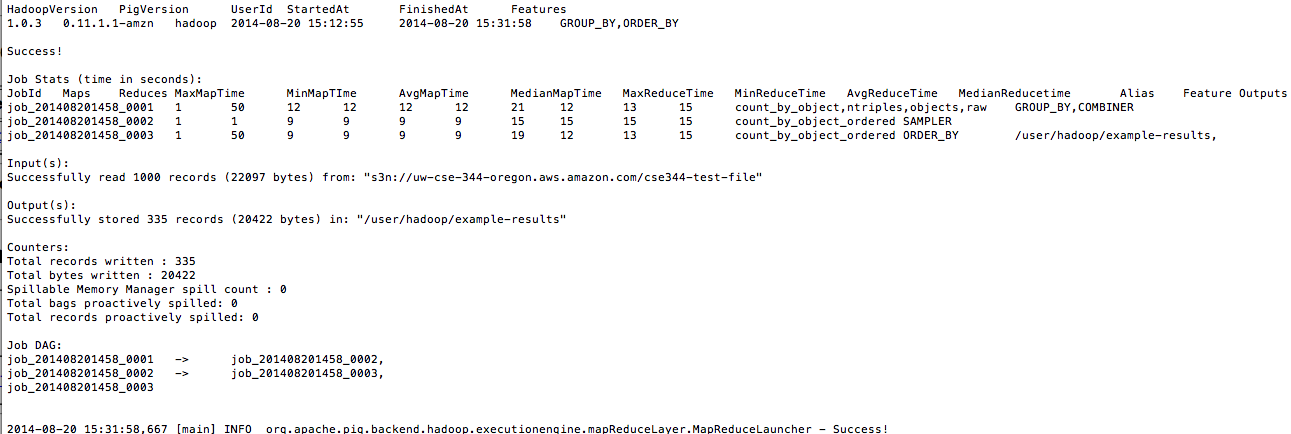
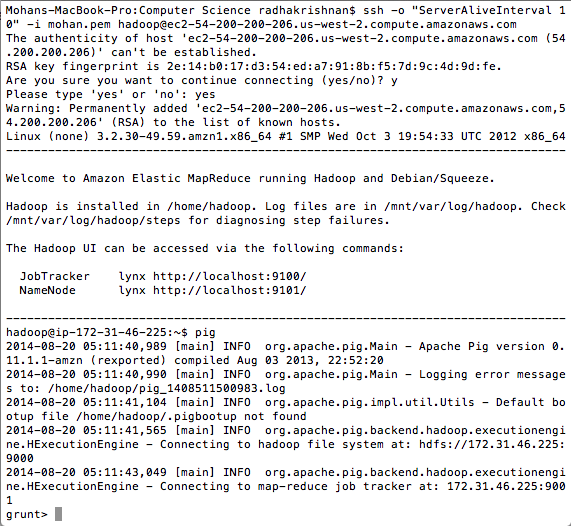
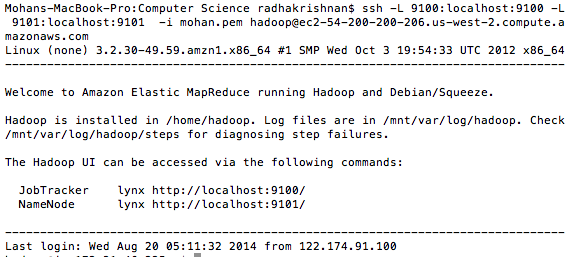
It is a interesting way to learn Pig which internally spawns Hadoop MapReduce Jobs. But the real fun is the Amazon Elastic MapReduce on-demand clusters. If the file is very large the EMR clusters should be used. It is basically Big Data analysis on the cloud.
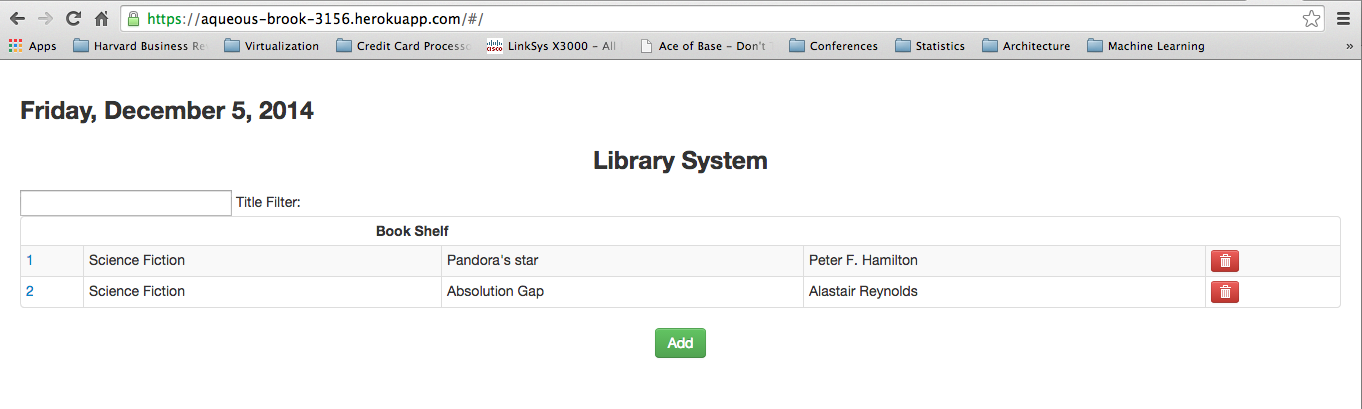
My AWS Pig Job

I executed some Pig Jobs on Elastic MapReduce by cloning the same cluster I used earlier(previous blog post). After that cluster setup my billing details were these.

I am still learning Pig. A sample of my pig commands are

grunt> fs -mkdir /user/hadoop
grunt> fs -ls /user/hadoop
grunt> register s3n://uw-cse-344-oregon.aws.amazon.com/myudfs.jar
2014-08-20 15:10:26,625 [main] INFO  org.apache.pig.impl.io.FileLocalizer - Downloading file s3n://uw-cse-344-oregon.aws.amazon.com/myudfs.jar to path /tmp/pig8610216688759169361tmp/myudfs.jar
2014-08-20 15:10:26,632 [main] INFO  org.apache.hadoop.fs.s3native.NativeS3FileSystem - Opening 's3n://uw-cse-344-oregon.aws.amazon.com/myudfs.jar' for reading
2014-08-20 15:10:26,693 [main] INFO  org.apache.hadoop.util.NativeCodeLoader - Loaded the native-hadoop library
grunt> raw = LOAD 's3n://uw-cse-344-oregon.aws.amazon.com/cse344-test-file' USING TextLoader as (line:chararray);
grunt> ntriples = foreach raw generate FLATTEN(myudfs.RDFSplit3(line)) as (subject:chararray,predicate:chararray,object:chararray);

After submitting the jobs one can track the Jobs using the tracker UI.

The successful completion of the Hadoop Jobs.

Screen Shot 2014-08-20 at 9.03.01 PM

This is an emancipatory experience 🙂 One is set free from the local offshore job experience.

My first AWS cluster

I have deployed to the cloud before but this time it is AWS.

Screen Shot 2014-08-20 at 10.40.17 AM

Screen Shot 2014-08-20 at 10.42.14 AM

Screen Shot 2014-08-20 at 10.45.01 AM

Screen Shot 2014-08-20 at 10.45.19 AM

A billing alarm for safety.

Screen Shot 2014-08-20 at 11.07.26 AM

Play deployment to CloudBees

I followed the instructions to deploy the Play application to CloudBees.

CloudBees SDK

I installed this SDK to interact with the cloud infrastructure. So this created a profile based
on my CloudBees account.

Mohans-MacBook-Pro:cloudbees-sdk-1.5.2 radhakrishnan$ bees help
# CloudBees SDK version: 1.5.2
# CloudBees Driver version: 1.3.8
Installing plugin: org.cloudbees.sdk.plugins:ant-plugin:1.3.0

You have not created a CloudBees configuration profile, let’s create one now…
Enter your default CloudBees API end point [us | eu]: us
Enter your CloudBees account email address: radhakrishnan.mohan@gmail.com
Enter your CloudBees account password:
Plugin installed: org.cloudbees.sdk.plugins:ant-plugin:1.3.0
Installing plugin: org.cloudbees.sdk.plugins:app-plugin:1.5.6
Plugin installed: org.cloudbees.sdk.plugins:app-plugin:1.5.6
Installing plugin: org.cloudbees.sdk.plugins:config-plugin:1.3.2
Plugin installed: org.cloudbees.sdk.plugins:config-plugin:1.3.2
Installing plugin: org.cloudbees.sdk.plugins:db-plugin:1.3.3
Plugin installed: org.cloudbees.sdk.plugins:db-plugin:1.3.3
Installing plugin: com.cloudbees.sdk.plugins:service-plugin:1.2.3
Plugin installed: com.cloudbees.sdk.plugins:service-plugin:1.2.3
Type ‘bees help ‘ for help on a specific subcommand.

SDK subcommands:
help List all commands
init Re-initialize the SDK config file
plugin:delete Delete a SDK plugin
plugin:info Get SDK plugin information

Application deployed to CloudBees

app

Provisioned MySQL on CloudBees

db

The parameters I was supposed to set

Mohans-MacBook-Pro:cloudbees-sdk-1.5.2 radhakrishnan$ bees config:set -a mohanr/playconf AppDynamics=false
Application config parameters for mohanr/playconf: saved

Application Parameters:
applyEvolutions.default=true
DB_USER=mohanr
DB_PASS=test
DB_URL=jdbc:mysql://ec2-50-19-213-178.compute-1.amazonaws.com:3306/playconftest
applyDownEvolutions.default=true
AppDynamics=false
Runtime Parameters:
java_version=1.7

The settings to enable evolutions did not work and I could not access the application.

So I switched off the evolution facility and removed 1.sql and then deployed the application. I think this evolution facility can be switched off in application.conf also.

Application Parameters:
DB_USER=mohanr
DB_PASS=test
applyDownEvolutions.default=false
applyEvolutions.default=false
DB_URL=jdbc:mysql://ec2-23-21-211-172.compute-1.amazonaws.com:3306/helloplaytest
AppDynamics=false
Runtime Parameters:
java_version=1.7

Deployment

Mohans-MacBook-Pro:hello-play radhakrishnan$ ./activator dist
Java HotSpot(TM) 64-Bit Server VM warning: ignoring option MaxPermSize=256m; support was removed in 8.0
[info] Loading project definition from /Users/radhakrishnan/Documents/hello-play/project
[warn] Multiple resolvers having different access mechanism configured with same name ‘typesafe-ivy-releases’. To avoid conflict, Remove duplicate project resolvers (`resolvers`) or rename publishing resolver (`publishTo`).
[info] Set current project to hello-play (in build file:/Users/radhakrishnan/Documents/hello-play/)
[info] Packaging /Users/radhakrishnan/Documents/hello-play/target/scala-2.10/hello-play_2.10-1.0-SNAPSHOT-sources.jar …
[info] Done packaging.
[info] Main Scala API documentation to /Users/radhakrishnan/Documents/hello-play/target/scala-2.10/api…
[info] Wrote /Users/radhakrishnan/Documents/hello-play/target/scala-2.10/hello-play_2.10-1.0-SNAPSHOT.pom
[info] Packaging /Users/radhakrishnan/Documents/hello-play/target/scala-2.10/hello-play_2.10-1.0-SNAPSHOT.jar …
[info] Done packaging.
model contains 30 documentable templates
[info] Main Scala API documentation successful.
[info] Packaging /Users/radhakrishnan/Documents/hello-play/target/scala-2.10/hello-play_2.10-1.0-SNAPSHOT-javadoc.jar …
[info] Done packaging.
[info]
[info] Your package is ready in /Users/radhakrishnan/Documents/hello-play/target/universal/hello-play-1.0-SNAPSHOT.zip
[info]
[success] Total time: 16 s, completed Feb 23, 2014 9:23:11 PM
Mohans-MacBook-Pro:hello-play radhakrishnan$ bees app:deploy -a playconf -t play2 target/universal/hello-play-1.0-SNAPSHOT.zip
-bash: bees: command not found
Mohans-MacBook-Pro:hello-play radhakrishnan$ source ~/.profile
Mohans-MacBook-Pro:hello-play radhakrishnan$ bees app:deploy -a playconf -t play2 target/universal/hello-play-1.0-SNAPSHOT.zip
Deploying application mohanr/playconf (environment: ): target/universal/hello-play-1.0-SNAPSHOT.zip
Application parameters: {containerType=play2}
……………………uploaded 25%
……………………uploaded 50%
……………………uploaded 75%
……………………upload completed
deploying application to server(s)…
Application mohanr/playconf deployed: http://playconf.mohanr.cloudbees.net

Create tables using MySQL Workbench

MySQL Workbench

The application was accessible now as the following screenshots show.

New Proposal

Submitted Proposal